
The ColorPerfect Help System

ColorPerfect in ColorNeg Mode

ColorPerfect in PerfectRAW Mode
The ColorPerfect Help System
This page is intended for those who would like to see what ColorPerfect is like without having to install it on their systems and for those who find manuals useful. ColorPerfect has no manual because it has a complete Help system built in, so this page uses the text from that Help system. In the upper right corner of the ColorPerfect dialog box is the Help button. Press it at any time while running ColorPerfect and a Help message area will appear so that you can click the item or activate the pull-down for which you want help. Here we will just browse through the controls. The illustrations show the PC version, but the Mac controls are positioned the same way.
Initial
The initial Help screen has suggestions for getting started with ColorPerfect. We have installed links so that you can follow those instructions here if you want to.
Getting Started Help: ColorPerfect works differently than other color systems. First see Help for the List Menu under Start, (upper right). Next, for the Black number box by the scrollbar, and then for the boxes under that to get the basic idea. Next, either try Help for CC to explore color control or explore Zones and Curves by getting Help for the Curves button and following its instructions to explore Zones. Then review Help for mouse clicks to see how those fit in. ColorPerfect also has an advanced feature which allows the user to use the full features of Photoshop to get the tonal (grayscale) image exactly as you want and then use ColorPerfect to apply the accurate colors of the image to the grayscale version. This uses the Alpha Channel, so we refer to this as The Alpha Feature.
Points of Interest
Start Box
PerfectRAW
Recognize Camera
Half Zones
Basic Controls
CC Controls
Ring Around
CC Buttons
FilmType Control
Dialog Top Controls
Film and Camera List Controls
Mouse Click and Shift Key Actions
Main Panel
Zones Controls
Turn Off Controls
CC Master Panel
Options
The Alpha Feature
Registration
Return to C F Systems Plug-Ins Page
C F Systems Home Page
Start Box Controls
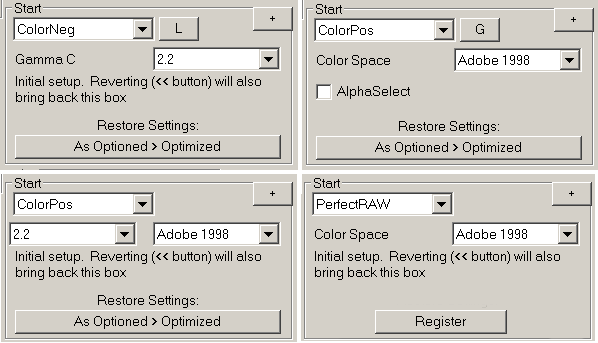
StartBox
The Start box appears only briefly when ColorPerfect starts so that you can define what ColorPerfect is to expect. The items available on the Start box depend on the kind of image being treated.
Choose Color Negative or Positive
Choose ColorNeg for film negatives. Choose ColorPos for first-time work on positive scans. For RAW images from digital cameras use the PerfectRaw Mode with MakeTiff (press Cancel, then Help, then Next Page for more explanation). Choose Touch Up for images which need no initial automatic adjustment, as when further tweaking is needed on images that have already been through ColorPerfect. Negatives should ALWAYS be scanned or imaged as linear 16-bits/channel (the ColorNeg default) unless that is absolutely impossible. (See Help for the G/L button if you can't do this.) All scans of either positive or negative material should be made with ALL image "enhancements" turned off or disabled and should be scanned in positive image mode (that is, scans of negatives will look like negatives). You should NEVER "convert" to a specialized scanner profile (or any other color profile) as that will inevitably produce inferior results - sometimes spectacularly inferior. ColorPerfect will operate on 8-Bit/Channel images but results for negatives will be very inferior. Monochrome (single channel) images can be worked and will produce monochrome results although some color adjustments are still active so you can see what you might gain by using RGB mode for toning.
Return to Getting Started
PerfectRAW
The PerfectRAW system was developed for digital camera RAW images and deals directly with fundamental errors in the way essentially all digital camera images are normally handled, achieving for most digital cameras a clarity and consistency of color unavailable elsewhere. For best results use the separate download MakeTiff to convert digital camera RAW images to linear TIFF. MakeTiff also allows PerfectRAW Mode to automatically recognize the make and model of most cameras as well as the white balance setting and the Color Space (working profile) you have chosen. Load the resulting tiff file into your photo editor (Photoshop, Photoline, Elements) and call up ColorPerfect in PerfectRAW Mode. PerfectRAW REQUIRES (on the Start Panel) a Color Space matching the one used for the current image. Normally you will have assigned a Color Space to the image using MakeTiff or your photo editor and the correct ColorSpace will be automatically selected, but if not, you need to select the default Working Space of your photo editor. If automatic camera recognition is not wanted please see Recognize Camera under Options.
Go to Points of Interest Index
GammaC
The GammaC List Menu is used to choose either the Color Space for the image or the Gamma-encoding or other encoding curve under which the image is to be stored. If you use the separate download MakeTiff to convert digital camera RAW files or to properly manage tiff files from a scanner please use MakeTiff to assign the desired Color Space or gamma encoding. If MakeTiff has been used or a working profile Assigned to the image GammaC will be set automatically. If not, make sure to choose the default RGB Working Space used in the Color Settings of your image editor (Photoshop, Photoline, Elements). If you do not know what this means and want to use PerfectRAW you need to find out whether your default is sRGB or Adobe 1998. Otherwise leaving this set at Adobe 1998 is usually a good start. Except for PerfectRAW, the GammaC menu is double-ended. If it shows Color Spaces you can select the last item on the list, Gamma Only, and the list will show only numerical gammas as it has in the past. At the end of the gamma only list you can choose Color Spaces to bring the Color Spaces list back. On the gamma only list besides the most commonly used gamma of 2.2, we have included Linear, L* encoding for profiles such as eci RGB 2.0, sRGB encoding for sRGB, and other values of GammaC such as the 1.8 used by Apple RGB, Colormatch RGB and eci RGB 1.0. Unless Linear input is selected it is assumed that the GammaC used to read in the image will be the same as the GammaC for the resulting image. See Help for the Option "Gamma C In/Out" if you want these to be different.
It is vital that you NEVER Convert into any profile prior to using ColorPerfect. For PerfectRAW and tiffs from scanned negatives or transparencies it is best to use MakeTiff and let it assign the preferred Color Space or encoding. Users not doing this should ASSIGN (not Convert) their default Working Space or desired Color Space to the image and set GammaC accordingly. This can be done either before or after exiting ColorPerfect although the latter might lead to a wrong preview rendition in the plug-in.
GammaC In
When the "GammaC In/Out" Option is selected, this list menu is displayed just to the left of the regular GammaC list menu. The selection in the list menu to the right remains the Gamma C for saving the image while this (left) list menu specifies the Gamma C to be used in reading the image. For example, some digital cameras insist on producing image files saved as sRGB, where you wish to operate using Adobe RGB 1998. You can set the left (input) Gamma C as sRGB and the right (output) Gamma C as 2.2. Assign (do not Convert) the Adobe RGB 1998 profile to the image either before or after using ColorPerfect. When you have selected the GammaC In/Out option the G/L button will disappear. Note that setting the input Gamma C to Linear is the equivalent of setting the G/L button to L when the GammaC In/Out option is not being used. Gamma C In will not show Color Spaces.
GL
The G/L button tells ColorPerfect what to expect as the input image gamma. For positive images (ColorPos and Touch Up Modes) the default is G, (that is, with "G" showing) and it is assumed that the input image uses the same storage GammaC as shown in the GammaC pulldown/pop-up. It you do not understand what this means, G is the best (and normally correct) setting for positives. If you are doing linear scans to produce the input image, this button should be pushed to show "L". For negative images (ColorNeg Mode) the default setting is "L" because color negatives should ALWAYS be scanned as linear 16-bit/channel if at all possible. If you can't do this, the default G/L setting for ColorNeg can be changed to "G" using Options - G/L Defaults G. The default can be set differently for ColorPos, ColorNeg, and Touch Up. The default is G for all 8-Bit/Channel images including ColorNeg Mode, but Options - G/L Defaults G:8 allows changing this. If the GammaC In/Out option has been selected, this button disappears. Also, in PerfectRAW Mode this button is not present because PerfectRAW normally requires special linear tiff files for input.
Recall
This button allows switching among five possibilities for initial settings, based on how much is to be remembered from the previous image. When ColorPerfect is started, the default Initial settings will be replaced by those of the previous image in accord with the Option button selections under Remember. Press the "As Optioned > Optimized" button to change which settings from the previous image are remembered. Optimized will remember all settings available under Options - Remember that normally would make sense when transferring settings to a different image. BPoint and some other situation-dependent settings are rarely useful to remember and may be detrimental. The "Optimized > Basic" button goes to the next stage, removing CC and Black from the list that Previous remembers. "Basic > Fresh Start" remembers no settings from the previous image. "Fresh Start > Exact" will remember all image settings from the previous image. Exact is rarely preferred over Optimized unless the same or a nearly identical image is being treated (like movie frames). Finally, the "Exact > As Optioned" button completes the cycle, returning to the initial settings as specified. Settings are not meaningful applied across modes, so "Remembered" refers to the previous time the particular Mode (ColorNeg, ColorPos, PerfectRAW, or Touch Up) was used. Only Exact will automatically remember either BPoint or Selection from the previous image because it so often is disruptive to remember either of these. However the Options button allows you to Remember BPoint and/or Selection as part of As Optioned. Also see CCMaster to learn other ways to control transfer of CC, Black, and BPoint settings from one image to another. Also see CC Master to learn other ways to control transfer of CC, Black, and BPoint settings from one image to another.
Register

The Register button on the Start Box will bring up a dialog allowing you to enter your registration Key that will unlock ColorPerfect and remove the grid that appears on the preview and final images of the trial version. See the ReadMe.txt file for details or look for a line starting with a red "Purchase" on
http://www.c-f-systems.com/Plug-ins.html
to obtain a key. Pressing the Register Button will bring up the registration dialog box:

Enter the registration Key Code you have purchased. (You can Copy / Paste the Key Code on the PC or 64-bit Mac versions. On the 32-bit Mac versions Copy the Key Code as you would normally, click the registration Key edit box to highlight it and press tab to paste the Key in the box.) Then OK out of the registration dialog. Once the Key is entered you will then need to either OK or Cancel out of ColorPerfect to complete the registration. When the Key is properly entered, the registration still does not take place until AFTER ColorPerfect has been exited. The Plug-in will be fully functional the next time you start it.
Go to Top -- Go to Points of Interest Index
Basic Controls

[+]
This button switches the associated box between the Basic Adjustment panel and the Zone Control panel with the grayscale. The scrollbar List Menu also will select between these two views. To get help on the other panel press Close Message, press this + button, and then press Help again.
Scroll Control
The scroll control List Menu has a complete list of the parameters that can be manipulated using the scrollbar. Selecting an item will switch the scrollbar to that item and, if necessary, switch to the panel where that control is located. The list always contains all scroll elements, but some elements are not available in some modes of operation. Selecting an inactive element will have no effect.
Scroll Bar
The scrollbar can be used to adjust any one of a list of image parameters. Click one of the edit boxes to the right of the scrollbar to select a parameter to scroll or use the list expander just above the scrollbar. Adjustments can be made by sliding the thumb button. Finer adjustments can be made by clicking on the scrollbar above or below the thumb button and finer yet by clicking the up or down scrollbar arrows. Keyboard up-arrow and down-arrow give the same adjustment as the scrollbar arrows and the page up and page down key work like clicking on the scrollbar.
Basic Image Controls
These boxes to the right of the scrollbar are the basic image controls. Use the scrollbar or enter values in the boxes to change these settings. See Options if the scrollbar runs backwards to your preference.
Black
Adding or removing black is the most basic image control. Black should always be adjusted first. In other systems a similar adjustment may be called "lightness" or "exposure". The amount of black added or removed is given in photographic "f-stops" or Exposure Values so that each adjustment by -1 removes 1 stop of black and is twice as bright and each adjustment by +1 adds one stop of black and is half as bright. For entry into ColorPos Mode regular scans created with more than 8-Bit precision should be made much darker than desired and the Black control should be used to lighten them. Alternatively use ColorPerfect directly on linear scans or use the PerfectRAW system for digital camera RAW images. That way the Highlight control can preserve highlight detail that would otherwise be lost (clipped). See help for Highlight Stops. The basic color corrections for an image are also related to the black correction, see the CC (color correction) control. Return to Getting Started
White
Adding or removing white is the second most basic image adjustment, so it is amazing that other than with ColorPerfect it is very complicated - often impossible - to correctly add or remove white. Adding white is NOT the same as removing black. It is often helpful to think of adding and removing white in terms of adding and removing fog. Removing white can substantially increase image contrast by deepening the shadows. For this reason, the Shadow tails correction is tied to the White control. See help for Shadow: Degree. Adding white effectively adds fog to an image and because real fog is often not pure white, there is a CC White control to adjust the actual shade of added white. See the CC (color correction) control. In cases where BPoint or BP Tails needs adjustment, do that before adjusting White. Pressing the White Button next to the White text box switches between White and Graded White adjustment. The White tool adds or removes the same amount of white to every pixel so the effect is greatest in the darkest areas of the image. Graded White removes or adds progressively more white as pixels become brighter so the brighter areas of the image are also affected. You can use different amounts of White and Graded White at the same time, giving great control over the White effect and livening up images without destroying color.Return to Getting Started
B Point
BPoint stands for "blackpoint", the most common name for this correction. It is a setting most often best left at its automatically calculated starting value as that is usually better than any manual adjustment. Unlike so many other blackpoint corrections, this one is done correctly. BPoint is closely related to removing white, but not identical. It is intended to compensate for imperfections in light sensing devices or photo materials. In nearly all cases White is a better choice for user image adjustments. All Modes except TouchUp calculate an initial BPoint. This automatic calculation is redone any time the image calibration is changed; due to a different film selection or when a FilmType adjustment is made. In the rare case needing manual adjustment this must be done AFTER such selections have been firmed up and in most cases the BP Tails mode is preferable to BPoint for such adjustments. (See Help for BP Tails.) It is normally to be avoided, but sometimes it might be desirable to adjust differently for R, G, and B, so a BP Color control is provided for BPoint (but not in BP Tails mode). Any BP Color adjustment should be done after the primary BP Tails or BPoint adjustment. See the CC (color correction) control. Note that the Shadow tails adjustment for White is NOT applied to BPoint, which is intended to define pure black in the image.
BP Tails
The BPoint (blackpoint) adjustment is intended to correct for errors arising from the nature of color film and digital color sensors. As such, the automatic BPoint adjustment built into ColorPerfect normally works well and is sufficient. Users should use White, which is a similar but not identical adjustment. In some cases, mostly for some types of color negative, the automatic BP adjustment can be improved, but it is tricky to do so. We recommend trying the BP Tails method first. In this mode all three colors, R, G, B are adjusted in a coordinated way that is more likely to track the inherent errors. If you plan to adjust BP Tails, make it the first image adjustment performed because for the BP Tails adjustment to work properly some image properties need to be reinitialized. This will happen automatically if you actually adjust BP Tails and it may remove previous image adjustments. The value of BP Tails can usefully be varied over a very wide range, from 0.000001 to about 0.2. In BP Tails mode the CCBP values cannot be adjusted because they form part of the BP Tails adjustment. They can be viewed, however, so that you can see the changes as BP Tails is adjusted. Pressing the BP Tails button will take you into the same BPoint mode as in previous versions of ColorPerfect, where the overall BPoint level and the CCBP colors can be adjusted separately.
Saturation
The saturation adjustment increases or decreases the intensity of color in the image without changing the color itself and without changing perceptive brightness. This may be the first saturation adjustment to have a sound basis in physics and physiology and we believe the difference in purity of color will be obvious to most people. In addition, on a pixel-by-pixel basis the saturation is stopped when it can no longer be increased without changing the color of the pixel. Oversaturating pixels is impossible. See Fix Saturation under Options concerning a secondary effect of this feature.
For a unique ColorPerfect technique, take saturation down to 0, pure B&W, work the B&W image to perfection using zones and other tools and then bring back the color using saturation. Use the Moderate tool if you have overdone the zones.
Saturation adjustments can be made to apply to just a spectral band of color. Click the image during a saturation adjustment to select the central Hue of the spectral band - its color will show up at the top of a small square in the upper left corner of the preview. The lower part of the square will show the band of colors to be affected. Pressing the Saturation button will alternate between Saturation and Spread adjustment. Adjusting Spread will set the extent of the spectral band being adjusted with the affected part of the spectrum shown in the box in the upper left corner. Up to four independent Hue bands can be treated in this manner, selected for adjustment by the number button just to the right of the Saturation button. The effects of the four bands are combined to adjust the image and the radio button next to Saturation provides independent on/off control of the four bands. If Use Selection is on, Saturation adjustments are separate for inside and outside a selection and the color box for outside the selection will appear at lower right corner of the preview. You can reset any of the four Saturation-Hue channels by clicking inside the small Hue-Spectrum display box, which removes the click-selected Hue as well as setting the Saturation and Spread to their default values. Return to Getting Started
Gamma
This adjustment applies a common gamma curve to the underlying tones. This is basically the same curve as used for the middle gray slider in Photoshop's Levels except that it is not simply applied on a per channel basis but preserves color integrity rather than ruining it. When you select and use gamma, it will add a third set of grays to the grayscale by the zone boxes to show its effect in addition to any zone effect. The gamma adjustment is made prior to the zone adjustment.
When using FilmType adjustments, pressing the FilmType button so that it shows SubType will also change "Gamma" to "Film Gamma." A Film Gamma can be applied to a FilmType adjustment to scale all of the FilmType gammas higher or lower, considerably expanding the useful range of FilmType. If you have under- or over-developed film this Film Gamma Control can adjust the built-in film calibrations. Film Gamma is only for fine tuning film calibrations, while Gamma is intended to adjust the tonal scale in an already calibrated image.
Go to Top -- Go to Points of Interest Index
CC
CC stands for Color Compensation. Also see Help for R, G, or B for more CC-related information.
The CC List Menu always has four selections: CC, CC White, BP Color, and Tonal, and in some modes of operation, two more CP RGB and CP rgb, as described in the following. CC itself is the basic Color Correction control for the image. For those familiar with photographic CC filters, this adjustment is equivalent. Using CC is the correct way to color balance a calibrated image. ColorPerfect initially estimates the image CC and Gray clicking (press the Help button to get Help for Clicks), Ring Around, and AutoColor (see Help for these) are powerful methods for improving CC. You can also directly enter or scroll CC values for R, G, and B and you can key in an entire "filter pack" in R, G, or B by using a special form like /10R5B or /10r5G or /5b (for a tutorial click the "R" box). The subtractive primaries C, M, and Y also can be used for keyed-in filter packs.
The same CC principles are used for CC White, associated with the White control and for CCBP, associated with BPoint and BPTails. Technically CC White values are applied to White as a multiplier while CCBP values are added to BPoint, so these color controls behave quite differently. See help for White and for BPoint for further details.
The Tonal option from the CC List Menu is a tool unique to ColorPerfect. It takes advantage of the independence of color from image lightness/darkness (Black) which is part of Complete Color Integrity. This tool starts with the RGB values that are standard percentages of influence each of the three colors has on image lightness/darkness, G being the greatest and B being the least. If you scroll up the R value, the reds in the image will appear lighter and the blues and greens darker. G and B scrolling work similarly, with the three percentages tracking to always add to 100. This simple tool can produce amazing results in an image, and without changing the colors; only the lightness/darkness. To return to the initial neutral default settings, press the ClearCC button or enter -1 into the R box. Holding down the Shift key while scrolling Tonal will hold the Next color constant while keeping total at 100%, where Next for R is G, for G is B, for B is R.
CP RGB and CP rgb are new tools that originated with PerfectRAW. At this point these are primarily intended for creative use with PerfectRAW. These will change the colors in an image in such a way that a quite visible purity of color is retained over a wide range. This might be described as an abstract extension of color integrity. These adjustments can actually be saved in User *.pfraw files. Return to Getting Started
CC RGB
The human eye adapts to the prevailing color of the illumination in a real scene, usually giving the impression that the light is white, or nearly so. CC corrections and Color Balance are intended to make this same color adjustment. To work best, the image should be calibrated prior to color balancing. The PerfectRAW Mode does this properly for digital camera RAW files. The ColorPos and ColorNeg Modes provide film lists, calibration (film) file input, and the FilmType tool, all designed to help calibrating other image sources.
CC Filter Tutorial
A physically real 10R CC filter is of a light red color, passing (nearly) 100% of red light while passing only about 80% of green light and 80% of blue light. The 10 in "10R" comes from multiplying the filter "density" to blue and green (0.10) by 100. CC filter densities of the same color are additive, so that two sandwiched 10R filters are equivalent to 20R. In traditional color photography color adjustments use combinations of RGB CC filters, for example 10R 5B, called "filter packs." A filter pack of equal density in all three primary colors appears gray. For example 10R 10G 10B, appears gray and has a "neutral density" of 0.1. Since neutral density is equivalent to an addition of Black, by convention such combinations are subtracted out before reporting CC filter packs. Thus a filter pack 10R 15G 5B would have 5R 5G 5B subtracted from it and be reported simply as 5R 10G. In this way, filter packs should not contain CC filters of more than two of the three primary (RGB) colors. The filter pack tells what is happening to the color balance of an image independent of overall lightness. This traditional "filter pack" method is a convenient way to enter CC values and so R, G, and B will all accept filter packs entered with a preceding /, such as /10r5g or /5R10G, or even /5B10M, where M is the subtractive primary Magenta (that is, minus Green). Y for Yellow (minus blue) and C for Cyan are also recognized. Holding down the Shift key while scrolling a CC value will cause the entire filter pack to strengthen or weaken proportionally rather than just the selected R, G, or B. This works only for CC and not for CC White or the other CC list selections and it works best if the largest of R, G, or B is chosen to Shift-Scroll. Return to Getting Started
CC Buttons
In ColorPerfect, CC (color correction - see Help for the CC pulldown/pop-up) measurements are kept in the three different bins described below, which are added together to get the total CC. In ColorNeg Mode an initial CC calculation is made as part of the calibration/characterization of the film. This basic CC is kept in the Calibration Bin. It is generally not visible and will change if the characterization changes, as when selecting a different film or using FilmType. When you work with the CC controls, the CC values shown in the RGB boxes are kept in the Active Bin. Between the Calibration Bin and the Active Bin is a Reserve Bin intended to accumulate CC values moved into it from either of the other bins. Note that the ColorNeg Mode is the only Mode with Calibration Bins.
CC measurements are always relative to a reference condition. The reference CC is kept in the Reserve bin and starts at R = G = B = 0. Pressing the CC Ref button moves the CC values from the Active Bin to the Reserve Bin, setting the Active Bin and the CC display boxes back to zero. The total CC - and image color - remain unchanged. This new zero reference enables you to always have a reasonable scrolling range of CCs. This works the same in all four modes, ColorPos, ColorNeg, PerfectRaw and Touch Up and with either Black or White CCs.
CC Ref is also part of an advanced technique of dealing with the color balance of an image in which the main light source for the image is ambiguous, for example a scene with mixed sunny and shady areas which is not satisfactory when balanced for sun or for shade. First balance for the shady areas and press CC Ref. Next balance for sun - typically these balances are done by gray-clicking a neutral color area having the appropriate illumination. Then scroll the largest CC showing (R, G, or B) but hold down the Shift key while doing it. This scrolls along the direct color line between the shade and sun balances, allowing you to pick the best intermediate balance.
Pressing the ShowCC button will display the sum of the Active and Reserve bins in the CC boxes for each of the three colors. Releasing the button (PC and Mac-64) or clicking something else (Mac-32) will restore the boxes to their former values. This works the same in all four modes, ColorPos, ColorNeg, PerfectRAW and Touch Up, and with either Black or White CCs.
Using Show CC while holding down the Shift key will leave the total CC values in the Active cells and display boxes instead of restoring the former CC values when the button is released. For Mac 32 hold the Shift key down when you click the something else that normally would restore the CC values.
The ClearCC clears CC values to zero. The outermost Active Bin and the Reserve Bin are cleared to zero CC. It never makes sense to zero the Calibration Bin of ColorNeg Mode, so this is not done.
Go to Top -- Go to Points of Interest Index
Ring Around

Ring
"Ring Around" is one of the most useful tools for getting good color balance. A ring of nine images is produced with the current image settings shown in the middle. At the upper left are versions shifted to red, green, and blue as marked by small colored squares. At the lower right the complimentary colors cyan, magenta, and yellow are each positioned directly across the center from their compliments. The upper right is lighter and the lower left, darker. The amount of shift is shown in the Ring box in CC units (see CC control). Click a surrounding version with color that looks as good as or better than the center version and the image settings (and the entire ring) will be adjusted 1/2 way to that version. Fine tune by adjusting the Ring setting down and reiterating.
Go to Top -- Go to Points of Interest Index
Basic Controls Continued
AutoColor
This scroll control will take you through a sequence of possible color balances for the image. These possibilities are secondarily derived from the nature of the scene and the scene lighting. For a calibrated image, a good color balance is very often achieved at some point in the scrolling range, but in unusual cases this automatic approach may not work well. Note that gray click and the Ring around are other good tools for color balancing. Also be aware that an image first has to be in calibration before it can be properly color balanced.
FilmType
FilmType is a calibration tool primarily used for unknown films and scanned images, positive or negative - it is not useful for the PerfectRAW Mode. For best results, images MUST be in reasonable calibration before other adjustments are made. ColorPos and ColorNeg Modes provide calibration film lists, calibration (film) file input, and this FilmType tool, all designed to help initially getting the image into calibration. For images with unknown film types, or problem image files which appear to have been mishandled, FilmType scrolling was invented by C F Systems to optimize human eye judgments for approximately calibrating digital images. First, click an area in the image that should be close to a middle-gray, using a shift-click if necessary to force it to gray. Then start scrolling FilmType, gradually exploring the entire range of the scrollbar. Find a "sweet spot" where the image begins to look "right" in darker areas and especially in the highlights. At the sweet spot, click the FilmType button and scroll in SubType mode, which makes the overall color effect weaker or stronger. Again, stop where it looks best and then try FilmType again in a small region around the setting you chose before. Alternate between Film-and Sub-Type until the image looks most natural. Once you have found the best FilmType number, you can use it for just this image or you can see if it will work well with other images from the same source. The FilmType number is Film.Sub where each is three digits. This can be recorded and later keyed in directly to try for another image or as a starting point for FilmType scrolling. If results for several images from a similar source yield similar FilmType numbers, you have a reasonable calibration for that image source. You can save this calibration in a User film file (*.negpos for ColorNeg or *.colorint for ColorPos) by typing a name into the Film List box and using Add/Chg to record and Save to save to the film file. Note that as you use the FilmType tool, a set of RGB gammas is listed in a box at the lower right. These gammas are the calibration that is sent to the film file. Pressing this button also changes the "Gamma" control to "Film Gamma." Adjusting Film Gamma will expand or compress the dynamic range so that you can better tune the calibration. Film Gamma is included in the gammas when saving the calibration as a new film.
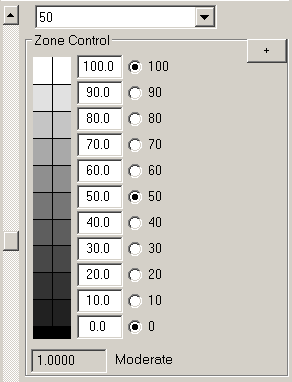
Moderate
"Moderate" as the verb; to make less extreme. In editing the zone curve most people tend to overdo it, especially on the first try. The Moderate control will decrease (or increase) the deviations from normal proportionally for all zones. Each time Moderate is selected, it starts with a value of 1.0, meaning no change. Values below 1.0 will decrease the amount of the zone adjustments and values above 1.0 will increase the adjustments. If you complete your Moderate adjustment and go on to other things and then come back to Moderate again, it will restart at 1.0, which means no change from the current state. Adjustments of Moderate can be alternated with editing the + marks for the zone curve, a very powerful combination for adjusting the light/dark relationships in an image.
Go to Top -- Go to Points of Interest Index
Controls at Top of Dialog

Undo
The Undo controls allow you to go back and forth through previous settings you have made. Understand that exactly what should constitute such a previous setting is a matter of personal preference, especially with regard to scrollbar settings, and your preference will never exactly match ColorPerfect's. There are a maximum of about 50 previous settings saved. Unless you specify otherwise (see Options) the Zoom state is not preserved, so you will retain the current Zoom as you go backward and forward. Also note that you can change the Zoom setting as you go backward and forward. See Help for the Save List for a more controlled method of returning to previous settings.
Revert <<
This button will restart Color Perfect. This is the only way to bring back the initial Start panel once it disappears. The Start panel allows choosing between ColorNeg, ColorPos, PerfectRAW, and Touch Up Modes, specifying linear or gamma-encoded input defining Gamma C, and selecting Color Spaces. Reverting will also immediately put into effect any changes that have been made in the Options settings.
Ahead >
This button will advance one setting. This only works if the previous step was to go back (undo) and repeated clicks will of course only take you through settings that you had gone back through immediately before this.
Back <
This button will go back one setting each time it is pressed.
Save List
The Save List allows you to save specific stages (states) during your ColorPerfect image editing session and can also be used for comparing adjustments. The function is similar to Undo, but the saved states can be restored at any time during the session. The Save List starts at A. Press the <+> button when you want to save the current state of your edit. That state is then stored under A and the list will advance to B. You can save editing states in this manner any time you wish, up through the letter K. To restore a saved state, select it from the list. Note that when you press the <+> button, the current state will be saved under whatever letter the list shows, so if sometime after you restore a state you want to save a state again, you likely will want to select the last letter on the list first so you do not replace an already saved state. If that last letter is not K you can be sure that it's unused. When holding down the Shift key while selecting a letter from the list, the selected state will NOT be restored. This allows you to easily replace states on the list. Recalling a previously saved state from this list will automatically clear the Undo list (but the Save List remains unaltered).
Zoom
The Zoom List Menu will select from a list of several possible preview image magnifications. 100% zoom shows actual pixels and the lowest percentage shown will put the full image into the preview. Control-Clicking (or right-clicking on the PC) a point in the preview will cause that point to be used to center zoomed previews. The zoom level and the center point can be changed at any time. By default, the zoom state is NOT saved as part of the Undo or Save List processes. See help for SaveZoom (under Options) if you prefer it otherwise.
Tails
The Highlights and Shadows boxes control the level of detail seen in the brightest and darkest areas of the image. To do this, the tonal scale is compressed according to these settings. The boxes showing numbers track the percentage of actual highlight and tails clipping in the region of the image shown in the preview, but be aware that clipping is not necessarily bad nor is it always easily visible. Rely on your eyes for best judgment of image quality. The highlight and shadow controls can be operated as a list menu or as a data entry box that operates with the scrollbar in the same manner as the Black control, thus allowing settings in between those on the list menus. In most cases the scrollbar will attach to the control only if the data entry box is used. This allows the user to use the method of scrolling Black or White while also using the lists if desired. So, one really should choose either to use the lists or not to use them and generally stick to that method. The ranges of values that can be set by scrolling the Highlight tools are somewhat wider than the ranges available by using the lists.
High Stops
This selects the number of photographic f-stops to preserve above the brightness that would be clipped without this correction. ColorNeg Mode handles color negatives properly for this as does PerfectRAW Mode for digital camera RAW images. For ColorPos Mode be sure to adjust exposure to produce fairly dark positive scans. Experiment with the settings but 1.0 to 2.0 in High Stops often works well. In PerfectRAW Mode you might encounter tinted highlights when compressing highlights which can be remedied with the SmartClip feature. Note that image values yet brighter than High Stops will (and should!) clip.
High Range
This controls how far down into the bright areas the highlight compression should extend, on a standard pixel basis. For example "235" means that all pixels that have average brightnesses 235 and above will be involved in the compression. Lower numbers will give a smoother response and higher numbers will give brighter highlights but with somewhat less detail.
Shadow Degree
This controls the degree of shadow compression and thus also how far up into the dark tones will be lightened. The measurement is relative. This control works in connection with negative White adjustments (which darken the shadows), but the control does not affect BPoint or BP Tails adjustments, which are usually best made automatically.
Go to Top -- Go to Points of Interest Index
Film List Controls
ColorNeg Film List
 User Film List
 PerfectRAW Camera List

Film List
In ColorNeg Mode, the Film List Menu shows the film calibration choices available for the selected Maker and in PerfectRAW Mode the List Menu shows the digital camera RAW calibration choices available for the selected Maker. If the list does not show your exact film or camera or you don't know your exact film, try a few that seem closest. For the "User" Maker and when there is no Maker list, the film list is drawn from the current *.negpos file (ColorNeg Mode), *.colorint file (ColorPos Mode), or *.pfraw file (PerfectRAW Mode). In this User mode, the name shown can be edited to Add a new film to the list, and films can be Deleted from the list as well. These lists need to be saved to file before you exit ColorPerfect or you will loose any changes made therein. ColorPos always has a "Normal" film, PerfectRAW always has a "Generic Digital Camera" listed and ColorNeg always has a USER film "B&W Start." These special films cannot be altered or deleted and have the R, G, and B gammas all set to 1.0 to serve as reference points. The Generic Digital Camera is a bit different in that it is set up with typical digital camera values that work reasonably well with a wide range of digital cameras.
Maker
In ColorNeg Mode there is a list of Makers - manufacturers of color negative film and in PerfectRAW Mode there is a list of digital camera manufacturers. Selecting one will update the Film List or Camera List so that it shows all built-in films or digital cameras made by that manufacturer. In addition to actual manufacturers, the Maker list includes My Films or My Cameras, lists of manufacturer's films or cameras you personally use (see Help for the My Films/My Cameras button) and User. In User mode you can develop and handle your own list of film or digital camera calibrations.
Add - Change
In ColorPos Mode or in ColorNeg's and PerfectRAW's User Mode, you can edit the name in the Film List List Menu. Add/Chg will add a new calibration under this name to the list so it can be accessed in the future. The only way to produce new calibrations in ColorPerfect is with FilmType Scrolling, (see Help for the FilmType box), so if you have produced a FilmType calibration that you think will be useful, enter a new name for it in the Film List box and press Add/Chg. This action will only save the new name for the current session. To save it permanently, use the Save button to put it on file with the rest of the current Film List. When FilmType is activated, it puts "FilmType in use" in the Film List box. Edit that into the film name you want and use Add/Change to record your new film. Don't forget to Save if you want to keep the new film for future use.
Delete Film
In ColorPos or in ColorNeg or PerfectRAW User Mode, you can delete the currently selected entry in the Film List List Menu. Pressing Delete will remove the entry just for the current session unless you also use the Save button to save the current Film List to file.
Save Film File
Pressing this button will save the current film list to a file. A file save dialog box will come up and allow you to replace the currently selected film file or to select another one or to enter a new file name. The saved file will then become the currently selected film file and if you exit ColorPerfect by pressing OK, it will become the default film file for the next session. Different files and different default files are used for ColorNeg Mode (*.negpos), ColorPos Mode (*.colorint), and PerfectRAW Mode (*.pfraw). Touch Up Mode has no associated film file.
Load Film File
Pressing this button will load the film list from a file, replacing any current film list. A file open dialog box will come up and allow you to select a file name for the save. The loaded file will then become the currently selected film file and if you exit ColorPerfect by pressing OK, it will become the default film file for the next session. Different files and different default files are used for ColorNeg Mode (*.negpos), ColorPos Mode (*.colorint), and PerfectRAW Mode (*.pfraw). Touch Up Mode has no associated film file.
My Films
The MyFilms and MyCameras buttons let you build and maintain a list of manufacturer's films or digital cameras which you use most often, for easier access. MyCameras works with digital cameras exactly as MyFilms works with films in the following description. The +MyFilms button appears when the Maker list is set to a manufacturer (that is, not to User or My Films). Pressing the button will add the currently selected film to your MyFilms list. When the Maker list is set to MyFilms, your selected films will appear in the Film List and the button will change to -MyFilms. Pressing the -MyFilms button will remove the currently selected film from your MyFilms list. User films cannot be placed on the MyFilms list and the MyFilms list is not affected by the Save or Load buttons.
Go to Top -- Go to Points of Interest Index
Selection and Mouse Click Reporting

UseSelection
Set up a selection on the image in Photoshop before calling ColorPerfect and you can make completely different edits to the portion of the image inside and outside of the selection. Checking Use Selection puts you into this dual mode; select In(side) or Out(side). Any editing prior to checking Use Selection applies to the entire image. To illustrate, one common use of this feature is the treatment of scenes with a bright sky and darker foreground. Select the bright sky area. An easy start is to first adjust the image so the highs are completely blown, use Select - Color Range to get just the sky, save the selection in another image, revert to the original image and load the selection just saved. Clean up the selection if necessary and Select - Feather just a few pixels. Then ColorPerfect edit the image based on the foreground and Use Selection to pull down the too bright sky. Practice will perfect this technique and lead on to other uses.
Click
The Click Mode box (lower right) shows which click mode is in effect for clicking into the preview and the two boxes above that show the original RGB values of the clicked point and its RGB values after the click takes effect.
Click Mode shows the current way in which clicking the preview image will be interpreted.
Gray - Click an image area that should be gray (neutral) and CC (color correction) will adjust.
Zone - While a zone is active click will make an area take on that zone value if possible.
Curve - While curve is showing, click a +, hold, drag up or down and let go to edit the curve.
Ring - While ring around is showing, click any surrounding box to adjust 1/2 way to it.
Clip - Click an image area to adjust the color of highlights that are affected by SmartClip.
Hue - When adjusting Saturation, click to select the central hue for color band to be affected.
Control-Click or right-Click - Will re-center the preview at the clicked point for the present and future zooms.
Shift-Click - During either Zone or Curve will adjust Black (all zones), and during Gray will force adjust CC so that clicked area is gray even if change is extreme.
Alt-Click (Option-Click) - During either Gray or Zone will display values without making adjustment and during Curve will add or remove a + point.
Special Shift button controls:
Shift-ShowCC - Removes Reference CC pack
Shift-CCRef - Will set the current Black Level as zero.
Shift SaveList - Just switch save letter in place without restoring it, so user can replace it.
Shift-Alt-(>) - Flip between regular and Retina mode, Mac-64 Retina mode version only.
Special Shift Scroll controls:
Shift Scroll CC - Regular CC mode only, causes the entire filter pack to strengthen or weaken.
Shift Scroll CC - Tonal mode only, holds "next" color constant while keeping total at 100%, where Next for R is G, for G is B, for B is R.
Shift Scroll Saturation Spread - Temporarily sets saturation value to 0 to show the effective range of Spread.
Ctrl-Shift when starting ColorPerfect from the Filters Menu - Reset to defaults, PC.
Alt-Shift when starting ColorPerfect from the Filters Menu - Reset to defaults, Mac.
Command-Shift when starting ColorPerfect from the Filters Menu - Reset default dialog size, Mac-64 only.
Before
Before lists a zone value followed by R, G, and B values. The zone value is the value of the last point clicked prior to any editing changes resulting from that click. The R, G, and B values are the RGB values of the point in the original calibrated image, that is, after the first CC "bin" corrections. This box is updated for Gray and Zone mode clicks and for some other operations that affect the Gray reference. During FilmType scrolling, this box will show the "Gammas" involved in the FilmType calibration process.
After
After lists a zone value followed by R, G, and B values. The zone value and the RGB values are the values at the last point clicked after any editing changes resulting from that click or those that would have resulted from the click if the Alt (Mac:Option) key had not been pressed. This box is updated for Gray and Zone mode clicks and for a few other operations that affect the Gray reference.
Go to Top -- Go to Points of Interest Index
Main Panel Controls

[+]
This button switches between the Main Panel containing miscellaneous information, the Turn Off Panel, which allows toggling on and off various adjustments that have been applied to the image, and in some modes, the CC Master Panel, which enables saving image color settings for use with later images. To get help on the other panels, press Close Message, press this + button, and then press Help again. The Start Panel that initially comes up in this space can only be brought back by reverting (<< button).
FilmFileName
This box shows the name of the currently active Film File, *.negpos for ColorNeg Mode, *.colorint for ColorPos Mode, or *.pfraw for PerfectRAW Mode,
SmartClip
Images from digital cameras often have one or more of the color channels clipped. That is, green may be overexposed and clipped while red and blue values on the sensor are lower and do not clip. When the channels are color balanced this results in tinted highlights - heavily tinted magenta for this green overexposure case. When this happens, SmartClip will even out the clipping in the three colors (R, G, and B) so that the highlights are no longer tinted. If you do not see this highlight tinting effect in an image when you check and uncheck SmartClip the image does not have this type of overexposure clipping.
SmartFreeze
Normally when SmartClip goes into effect the corrected clipped highlight area should be neutral (white to light gray) in color to blend properly with the image, but for some images it needs to be tinted to blend properly. When this happens, click this SmartFreeze button and then click an area in your image which has the correct tint for the corrected clip areas. It may take several tries before a satisfactory tint is found. When the tint is satisfactory click this button, which now says SmartLock, again. The SmartClip tint will be locked and future image clicks will return to being gray-clicks. If you further alter the color balance of the image the selected SmartClip tint will float with those changes to maintain a proper blend. In this stage the button will read SmartThaw. Pressing it again will release the SmartFreeze tint back to white to light gray and the button will again read SmartFreeze. If Use Selection is on, SmartFreeze actions will be independent for inside and outside the selection, very useful for more complicated images.
Options
There are options available to tune some actions or appearances of ColorPerfect to be more like you expect or prefer. To save option settings for future ColorPerfect sessions it is necessary to OK out of ColorPerfect (Cancel will not save Options), but changes in Options can be made to take effect in the current ColorPerfect session by reverting (<< button). Go to the individual options. - Go to Points of Interest Index
Curve
The Curves button places the zone curve across the preview image. (For zone help, click the "60" box by the scrollbar - if it doesn't show click Close Message and then click the + button by the scrollbar.) The zone curve runs from dark (0) at the left to light (100) at the right. Zone points are fixed at intervals of 10 (10, 20, 30,...) [or 5 (5, 10, 15,...) for Half Zones mode] along the curve. Control zones show as + marks on the zone curve. They can be edited by clicking above or below a +, or by dragging it upward or downward and releasing the mouse. Control (locked) zones are held fixed except for the one being edited. All non-locked zones between the edited control zone and its adjacent control zones will follow its movements. Control zones can be turned on or off by Alt-clicking (Mac: Option-clicking) their position on the curve. Dragging a + while the Shift key is depressed will move the entire zone curve so that all tonal values will become lighter or darker; that is, the Black control will be adjusted to do this. See Moderate, as a companion to zone curve editing and see Options if you wish to reverse the direction of the editing functions. Return to Getting Started
Color Balance Source
The pair of Color Balance buttons help to compare and control the initial estimates of color balance (CC) and later user-determined color balance settings. We call the button on the left the "Source" button because it shows on its top the source of the current color balance used in the preview. This may be Basic: the initial ColorPerfect estimate, Camera: the estimate according to a digital camera "neutral", Working: the current CC as adjusted by the user, or Best: a color balance which can be picked by the user at any time by pressing the Save as Best button.
Initially ColorPerfect selects a starting Color Balance (CC) in one of three ways and the chosen method will be shown on the Source button: Basic as described above, Camera as described above or CC Master Carryover (see Help for CC Master) which will show on the Source button as Working.
At any time pressing the Source button repeatedly will sequence the image through the currently available of these four CC settings. Typically not all four settings will be available and in fact there might be just one, normally Basic. By its nature, the Working setting is continually changing as the user adjusts color balance by any of the several means available. When the user starts a sequence of pressing the Source button the Working setting is temporarily saved so that as the user continues to sequence the Source button, when Working comes up again the preview will show those saved settings. Any time that the user changes the color balance by any means other than the Source button, the Source button will change to Working, indicating that it has accepted the new color balance. Changes which may invalidate color balance, such as changing the film or camera, may completely clear the Working CC.
Only when PerfectRAW Mode with input from MakeTiff is used for digital camera RAW images can the Camera setting appear. When available, Camera is the preferred initial choice over Basic.
Return to Getting Started
Go to Top -- Go to Points of Interest Index
Zone Controls

Zones
ColorPerfect controls the light/dark tonal curve underlying the colors via a "zone" concept. The zone scale is based on visually uniform L* from 0 = black to 100 = white. (L* is the same L used in the Lab mode, but ColorPerfect does not use Lab.) Note that the Black control effectively moves the ENTIRE zone curve lighter or darker. The Grayscale next to the zone boxes shows each zone value on the right and the original image value that will be adjusted to that zone on the left. ColorPerfect originally had zones 0, 10, 20,..., 100, but now optionally can have zones 0, 5, 10, 15,..., 95, 100. Turn on the Half Zones option to allow this extended zones feature.
ZoneValue
Entering a zone value into a zone box will adjust the tonal scale of the image while preserving natural color. Neither traditional RGB curves nor Lab curves do this correctly. For instance, with the 60 box active, entering 55 will lighten all image tones around 55 to around 60. Scrolling also works and clicking a point in the image will attempt to adjust all tones of that zonal value to 60. For more zone help, click the Curve Button or a zone select circle. Tabbing will enter the number, but the cursor will remain in the selected box.
ZoneLock
These zone selectors set the control points of the zone tonal curve. For example, if only zones 30, 60, and 80 are selected and zone 60 is adjusted the surrounding zones 40, 50, and 70 are smoothly adjusted as well, but the other selected zones remain locked so that 30 and below stay unchanged and 80 and above stay unchanged. For more zone help, click the Curve Button or a zone box.
Moderate
"Moderate" as the verb; to make less extreme. In editing the zone curve most people tend to overdo it, especially on the first try. The Moderate control will decrease (or increase) the deviations from normal proportionally for all zones. Each time Moderate is selected, it starts with a value of 1.0, meaning no change. Values below 1.0 will decrease the amount of the zone adjustments and values above 1.0 will increase the adjustments. If you complete your Moderate adjustment and go on to other things and then come back to Moderate again, it will restart at 1.0, which means no change from the current state. Adjustments of Moderate can be alternated with editing the + marks for the zone curve, a very powerful combination for adjusting the light/dark relationships in an image. Return to Getting Started
Go to Top -- Go to Points of Interest Index
The Alpha Feature
ColorPerfect can apply the accurate colors of an RGB image to the tonal scale of another version of that image. An alpha channel is used to supply the target tonal scale. (As shown at the end of this help item, a selection mask may be substituted if the alpha channel feature is not available.) Starting from a copy produce an image with the tonal scale you desire - without worrying about color. You can use any of the wide range of Photoshop controls in this but leave pixel-moving controls like the clone brush or sharpening until later. Once the tonal scale suits your needs use ColorPerfect. in TouchUp mode to set Saturation to 0. OK out and with only the Green Channel active, select all and copy. Return to the original image file (negative or positive) which must be background without additional layers. Go to the Window => Channels panel, create a new channel and paste the copied monochrome image into it. Hold the shift key depressed and click on RGB so that four channels are selected - they get highlighted with a colored band. Re-entering ColorPerfect. the tonal scale supplied is instantly applied to the original RGB image. After exiting ColorPerfect. remember to turn the Alpha channel off again. This very powerful feature can produce spectacular results and is well worth practice and experimentation.
The original Alpha Channel feature is only available in Adobe Photoshop CS but and above, but in Photoline and Photoshop 7 it is possible to use a selection mask which is a monochrome version of the image in place of the Alpha Channel. One of the ColorPerfect. Options is Show AlphaSelect. If you turn on this option, the ColorPerfect. Startup box will show a checkbox AlphaSelect any time a selection mask is available in the image. Checking the box will cause ColorPerfect. to use the selection mask in place of the Alpha Channel as discussed above, thus making this unique tool available to more users. With Photoline, first create a grayscale image with the proper tonal scale, as described above for the Alpha Channel. Save this image temporarily as a *.pld file. Then return to the original image file and from the Tool Menu select Mask - Load Mask and load the *.pld file you just created. Click AlphaSelect in the ColorPerfect. Start box and it will behave like Alpha Channel Mode. With Photoshop 7, it is a little more complicated. Prepare the image as described for the Alpha Channel, up through selecting just the Green Channel. Then Image->Mode, select 8-bit/channel. Under the RGB Channels box, press the button on the left, "Save Channel as Selection." Then use Select-> Save Selection and save as New Document using any Name you choose. Note that this saved mask is a grayscale image that can be further edited if you wish. Restore the original image file and use Select->Load Selection to recover the selection. Click AlphaSelect in the ColorPerfect. Start box and it will behave like Alpha Channel Mode. There is a web page describing this feature in more detail.
Return to Getting Started
Go to Top -- Go to Points of Interest Index
Turn Off Controls

TurnOff
The Turn Off panel features switches used for quickly turning off and on various adjustments that have been applied in ColorPerfect. Note that the circle selectors near the scrollbar, next to Black, White, B Point, Saturation, and Gamma will switch those elements individually. All of these switches apply to both the preview AND the final image. The All switch will turn off all editing, and All But Black is provided to allow bringing in an intentionally dark image and lightening it (Black adjust) in ColorPerfect in order to preserve highlights. Zones turns off all zone curve adjustments and Tones turns off the Tonal adjustment found under the CC List Menu. Highlights and Shadows turn off the tails compression, and the CC switches turn off the three possible CC adjustments.
Go to Top -- Go to Points of Interest Index
CC Master Controls

CCMaster
The CC Master panel provides a means of applying commonly encountered CC (color compensation) settings from one image to other similar images. Images taken on the same film or with the same digital camera under similar lighting conditions usually require similar or even identical color compensation. Insert the settings determined for one such image and then Apply them to other similar images. Note that the CC Masters for ColorPos, PerfectRAW and ColorNeg are completely independent. There is a fixed item of _Previous that appears in the CCMaster list and always refers to the previous saved image of the same mode (ColorPos, PerfectRAW, or ColorNeg). _Previous cannot be manually changed.
Carry Over
Checking this box will cause the currently selected setting in CC Master to be directly applied to the next image loaded into ColorPerfect.
This option takes precedence over the Remember options for CC, Black, and BPoint for the Initial state on the Start Panel. This allows the user to select a different CCMaster Reference than _Previous (the previous image). Note that if _Previous is selected to carry over it will be the current image that is carried over because the current image becomes _Previous when it is saved.
Select
This List Menu has a list of ten possible names to be given to stored CC settings and an additional name _Previous which always refers to the stored CC settings for the previous saved image for the current mode (ColorPos, PerfectRAW, or ColorNeg). A name can be selected for applying already stored CC data to a new image or (excepting _Previous) to be used for storing the current CC settings for future use. To make a new name for storing current CC settings, any name (except _Previous) can be changed by typing to replace it. There are ten names besides _Previous on the list and the name length is limited.
Save
This will save the current list of CC Master names and settings to a file. _Previous is not included in the Save. A File Save dialog box will come up allowing you to specify the file name and location. The file will be *.negcc for ColorNeg Mode, *.poscc for ColorPos Mode and *.rawcc for PerfectRAW Mode.
Load
This will Load a list of CC Master names and settings from a file. _Previous is not affected by the Load. A File Open dialog box will come up allowing you to specify the file name and location. The file will be *.negcc for ColorNeg Mode and *.poscc for ColorPos Mode and *.rawcc for PerfectRAW Mode.
CC
If this box is checked, when the stored settings are applied to a new image, the CC settings will be applied. The settings are applied either by using the Apply button or initially, via the CarryOver option. In normal operation this box is checked.
Black
If this box is checked, when the stored settings are applied to a new image, the Black (lightness) settings will be applied. The settings are applied either by using the Apply button or initially, via the CarryOver option. In normal operation this box is not checked. This option is only helpful for images that are very similar.
BPoint
If this box is checked, when the stored settings are applied to a new image, the BPoint settings will be applied. The settings are applied either by using the Apply button or initially, via the CarryOver option. In normal operation this box is not checked. This option is only helpful for images that are extremely similar.
Insert
This button will take the current CC settings of the current image and store them under the name shown in the CC Master List Menu. If you later OK out of ColorPerfect the settings will be saved (unlike User film list names). The Save button can be used to put the CC Master list into a file. The Active Bin, Reserve Bin, and the Calibration Bin CC values are added together for this operation as this is what is generally required for this to work well. _Previous is not affected by the Insert button.
Apply
This button will take the CC settings stored under the name shown in the CC Master List and apply them to the current image. The Calibration Bin CC values of the image are not altered and the CC values in the Active Bin and Reserve Bin adjusted to form the correct total CC adjustment, as is required to make this work well.
Go to Top -- Go to Points of Interest Index
Options

ScrollDirection
ColorPerfect has a completely different - much more accurate - approach to color image editing. In this system the most basic image treatment is adding and removing Black. Technically it makes more sense when scrolling Black upward to make the image more black; darker. But because "everyone" is used to lightness controls for lightening or darkening images, we have set the default so that scrolling Black upwards makes the image lighter, which should reduce the initial confusion. After you gain familiarity with the system - or even from the start, for purists, you can use the checkboxes under Options - Scroll Direction to reverse the action of several scrolling parameters. Initially Black and Zones operate in reverse to reduce confusion, but all other corrections scroll in what we consider to be the correct direction. The directions for Black, Zones, and also White can be changed by checking the appropriate box. These changes will be saved and applied in the future (unless you Cancel).
FlatGraph
The default for the curve display is a flat graph across the middle of the preview image. Photoshop does its seemingly similar - but really very different - "Curves" plot starting as a diagonal line from lower left to upper right. Unchecking the Flat Graph box will cause the graph to take this second form. We find this confusing in practice because when plotting zones you must pull the curve down to lighten the image. But some people may prefer it. This change will be saved and applied in the future (unless you Cancel).
Save Zoom
Zoom settings are not saved as part of the Undo or Save List features. The current Zoom setting is retained while going through Undo or Save List. If you prefer having the Zoom settings saved for Undo and Save List processing, check this box. This change will be saved and applied in the future (unless you Cancel).
Recognize Camera
By default PerfectRAW Mode initially will automatically recognize the digital camera that was used to produce the image being treated and apply the appropriate camera characterization. This Option allows this automatic recognition to be turned off. Of course it is always possible for the user to select a different camera to replace the initial choice made by automatic recognition. Technically, in automatic recognition the camera model name in the exif data is used to recognize the camera and the User *.pfraw file is checked first, before the built-in cameras. This makes it possible for the user to effectively replace the built-in data by using the User *.pfraw file. To be recognized, the last characters of the camera name in the *.pfraw file must match the camera's exif model name. This allows the user to prefix the camera name with additional information if desired.
Go to Points of Interest Index
Half Zones
ColorPerfect originally had Zones 0, 10, 20,..., 90, 100, which was in the spirit of Ansel Adams although ColorPerfect Zones do differ in detail from his. Setting the Half Zones option will cause ColorPerfect to use Zones 0, 5, 10, 15,..., 95, 100 with a new zone halfway between each pair of the previous zones and which will allow more control over the tonal values of the image.
Go to Points of Interest Index
Fix Saturation
Saturation changes are limited on a pixel-by-pixel basis so that the color does not change; that is, saturation stops before clipping of pixels and the consequent distortion of color begins. By allowing saturation to go right up to the limit, it means that one of the colors, R, G, or B has been driven to fully off, 0, or that one of the colors has been driven to full scale on. This can result in a histogram with quite a few pixels either at 0 or at full scale, giving the appearance of excessive clipping even though there may be no clipping at all. While there is no harm in this, people who depend upon histograms may find it disconcerting. With this box checked the saturation algorithm is modified to stop a little short of the limit, removing the clipped appearance from the histogram, while causing a nearly invisible difference in the final image. It's your choice as to which you prefer. This change will be saved and applied in the future (unless you Cancel).
Remember
ColorPerfect by default starts with the previously selected film type (if any) and an automatic estimate of color balance, BPoint, and Black (lightness) and with neutral values otherwise for ColorNeg and ColorPos Modes, while Touch Up Mode starting values are chosen to have no effect on the image. The Remember settings specify starting with selected settings remembered from the previous image. If you are dealing with series of similar images, you may want ColorPerfect to start with the settings you had worked out for the previous image. The Remember settings do not extend across modes as that never makes sense. For example, if you have just started to work in ColorNeg Mode the reference image will be from the last time you used ColorNeg Mode even if you just previously used PerfectRAW Mode. Separate references are kept for ColorNeg, ColorPos, PerfectRAW, and TouchUp Modes. These Remember settings apply to the As Optioned settings of the image. The As Optioned > Optimized button on the Start Panel will let you try several other sets of pre-defined Remember settings on an image.
Remember CC
Remember the color balance settings from the previous image. Typically remembering the color balance will result in the current image getting the same CC settings as the previous image, but there are cases in which the CC numbers for the new image may be somewhat different to attain the same color balance. If you are not yet familiar with it please also investigate the CC Master Panel to learn other ways to control transfer of CC, Black, and BPoint settings from one image to another. In switching between different cameras or different films, it makes no sense to remember the CC settings from the previous camera or film, so ColorPerfect does not automatically remember CC in such cases.
Remember Black
Remember the Black setting from the previous image. If you are not yet familiar with it please also investigate the CC Master Panel to learn other ways to control transfer of CC, Black, and BPoint settings from one image to another.
Remember BPoint
Remember the BPoint setting from the previous image. This is rarely ever a good idea, especially for ColorNeg or ColorPos Modes, but may be useful in special cases. If you are not yet familiar with it please also investigate the CC Master Panel to learn other ways to control transfer of CC, Black, and BPoint settings from one image to another.
Remember White
Remember the White setting from the previous image.
Remember Saturation
Remember the Saturation setting from the previous image.
Remember Gamma
Remember the Gamma setting from the previous image.
Remember Zones
Remember the zones settings (Curves) from the previous image.
Remember Tones
Remember the Tones setting from the previous image. This is the setting obtained from the Tonal control that is part of the CC settings.
Remember Highlights
Remember the highlights tails settings from the previous image. You may want to keep this option checked once you have become familiar with its effects.
Remember Shadows
Remember the shadows tails settings from the previous image. You may want to keep this option checked once you have become familiar with its effects.
Remember Selection
Remember selection settings. If the image had different settings for inside and outside the selection they will be remembered and the image will open with selections active. For this to happen there must have been a selection made in the current image. This does NOT remember the shape of the previous selection.
GL Defaults as G
This option sets the normal default for the G/L button in 16-Bits/Channel mode, which tells ColorPerfect whether you are using a Gamma-encoded or a Linear image as the source. With the option checked, the button will come up as G, Gamma-encoded, and unchecked, the button will come up L, Linear. This default can be set differently for ColorPos, Touch Up and ColorNeg Modes. The original setting is G for ColorPos and Touch Up and L for ColorNeg. This option remains settable even when the GammaC In/Out option is selected, but then will have no effect until the GammaC In/Out option is turned off.
GL Defaults as G for 8-Bit
This option sets the normal default for the G/L button in 8-Bits/Channel mode, which tells ColorPerfect whether you are using a Gamma-encoded or a Linear image as the source. With the option checked, the button will come up as G, Gamma-encoded, and unchecked, the button will come up L, Linear. This default can be set differently for ColorPos, Touch Up and ColorNeg Modes. The original setting is G for all modes. This option remains settable even when the GammaC In/Out option is selected, but then will have no effect until the GammaC In/Out option is turned off.
GammaC In/Out
Ordinarily the same Gamma C is used to read in an image and to save the edited image. The most common exception is when the image to be read is Linear, and the G/L button is used to specify that. However, some workflows require the input and output Gamma C values to differ. For example, some digital cameras insist on producing image files saved as sRGB, where you wish to operate using Adobe RGB 1998. Selecting this option will place a new GammaC list menu to the left of the normal one in the Start box. The list menu to the left selects the input Gamma C and the one to the right selects the output Gamma C or Color Space. You will still need to Assign (do not Convert) the desired working profile to the image and this can be done either before or after using ColorPerfect. When this option is selected, there is no G/L button visible.
CCMaster First
Ordinarily the Main Panel comes up when the Start Panel disappears. Checking this option will cause the CC Master Panel to come up when the Start Panel disappears. For Touch Up the Main Panel will come up regardless of this option setting because there is no CC Master for Touch Up.
High Clip
This setting is used in estimating the initial lightness/darkness setting (Black level) for the overall image, and it also is used in the initial estimate of color balance. It is used each time a new calibration is applied, such as when a film type is chosen or scrolled. The default setting of 0.005 generally behaves well, with larger numbers going toward lighter and smaller numbers, darker. A number entered as a negative will be used as positive, but will be forced to be applied immediately. Separate values are kept for ColorPos, ColorNeg, and PerfectRAW Modes.
Shadow Clip
This setting is used in estimating the blackpoint (BPoint) for the overall image, including the BP Color adjustment. It is used each time a new calibration is applied, such as when a film type is chosen or scrolled. The default settings of 0.005 for ColorNeg and ColorPos and 0.0001 for PerfectRAW generally behave well, with smaller numbers making the image lighter and less contrasty and larger numbers, darker and more contrasty. A number entered as a negative will be used as positive, but will be forced to be applied immediately. Separate values are kept for ColorNeg, ColorPos, and PerfectRAW Modes.
Smart Clip
The SmartClip threshold tunes the operation of SmartClip and is measured in f-stops. The default value is 0.125 which is satisfactory for most cases. If SmartClip does not fix digital camera clips that appear in your images (as in images where extreme highlight areas are heavily tinted) try increasing this number, which can take on any value from zero to one. Higher values will also reduce highlight detail somewhat, so it is something of a balance. The best balance can be different for different camera makes and models. MakeTiff images which use the dcraw interpolation option sometimes require higher threshold values to work properly, while those using AdobeDNG interpolation usually will work with lower thresholds.
Go to Top -- Go to Points of Interest Index
Go to C F Systems Home Page
Privacy Policy and E-Mail